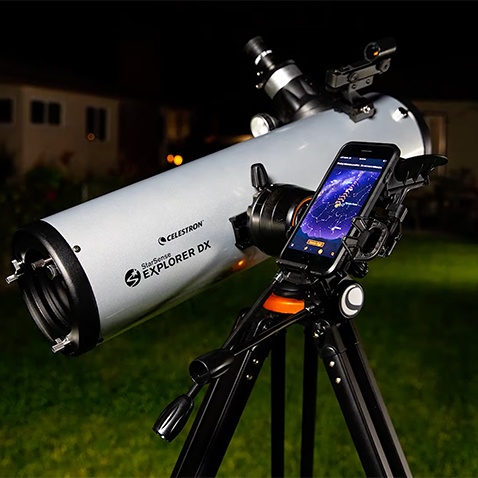
Beginners review of the Celestron Nexstar 4SE Computerised Telescope and why it's a good buy.4 Comments13 March 2023 | Admin Some years ago, I decided to further my interest in astronomy by buying a telescope. It was a fairly good traditional type telescope of the day at an affordable price. When I managed to find a planet it was pretty good, however, the words 'when I managed to find' are particularly relevant in that I found it very difficult and on the whole not very user-friendly, or at least to me. Eventually I sadly lost interest and the telescope found its way to the loft. My interest however always remained and at the age of 76 I decided to buy one of the new computerised Go-To telescopes. I was looking for an astronomy telescope under £500, was compact, so I could easily transport it, as light as possible, facility to attach a camera, had a good specification and of course it provided the facility for the computer to seek out the planets and alike. I did my research and eventually decided the Celestron Nexstar 4SE was the one, and it has proved after 12 months of use to be a very good decision. Photograph of the Celestron Nexstar 4SE. Why do I feel that way?. - When one compares it with other models it is a fair price taking into account it is well-made, robust and a very good overall capability. Let’s have a look at some of the above in relation to my experiences in its use over the last twelve months: b. I bought a suitable case long enough to take the tripod section without separating each leg from their support. The case takes the tripod, the mount, the telescope main section and all my other accessories. The case has wheels on one end so can easily be wheeled and lifted into the back of my car and fits nicely width wise. Yes, all of this will go into that case. May take a couple of trial runs as to what goes in first and where, etc. c. Other than for testing, do not bother with the batteries (x8) as they will not last very long and could let you down in the middle of a session. You can purchase a mains power supply, which is great but obviously of little use if you are in the wilds. I now wish I had bought the Celestron Power Tank Lithium Ferrite (18771-CGL) unit earlier, as it is absolutely superb, and it is now all I use. I do not need the power supply d. I did still have some difficulty doing the initial alignment to test out the go-to function. This was mainly due to the weather in being able to find the three required objects which need to be from different areas of the sky and of course my long-time problem with manually lining up using the finderscope provided. Eye capability did of course not help in this quest. However, I read about the Celestron Auto Align device but at the time no one stocked it, so I went on the PicStop waiting list and after many months of waiting they emailed me that they now had it back in stock. I bought it straight away and that has got to be the best buy for me as I can now align without any issues. (Except the weather). I have done a separate review on this item. It has to be a very serious consideration. e. The telescope does not have Wi-Fi built in to it, so to control with your phone or iPad or alike, you will need to purchase the Celestron Sky Portal Wi-Fi Module. This fits the auxiliary port on the mount. The Celestron Nexstar 4SE only has one such port so, as in my case because I had the Celestron Auto Align plugged into it, I had to get a port splitter. This now allows me to use my iPad to control instead of the handset, although I still mostly use the handset as I think it is the best way to learn about the capabilities of the telescope. f. I have used my Olympus DSLR camera on many occasions either attached directly via the required camera related adaptor to the rear outlet or attaching to the eyepiece itself. I have had some good success, or at least for my level of competence. Not only that, but I have now acquired the Celestron Neximage 10 Solar System Colour Camera Imager, and this is a very new learning experience. (I have written a review of this camera). This aspect of the telescope is very important to me as it means I can link Astronomy with my other hobbies in relation to photography and computers. You can also buy a special mount for a smartphone, which can result in some surprisingly good photos. Astronomy is not a cheap hobby, so it is essential not to spend more than you need to meet your requirements. Spending too little though may mean it does not meet your expectation, and such disappointment is not only frustrating but perhaps a waste of money and time. My requirements will be different to many others and my definition of success will certainly be different to a lot of others, but it is my hobby and my satisfaction level. I think I have achieved some good outcomes in relation to photos with by DLSR camera, but when you look at what others have achieved, they would be classed as sadly lacking. As a beginner, my joy is firstly getting something and then working to improve next time. It is for this reason that I think the Celestron Nexstar 4 SE is a very good buy. I hope this helps you in to decide on what meets your needs. Good luck. Review by Malcolm P
|


Follow Us© Picstop. All rights reserved. E-commerce by Real Media |
Free & Next Day Delivery Available0% Finance OptionsRated 4.8 ‘EXCELLENT’Easy ReturnsEstablished 2000          |
Great review Malcom.
Very helpful review. Thanks. I bought one off the back of it!
Super review, Im going to get one.
Please contact us if you have any questions, perhaps ab out accessories and availability.