Review of the Celestron NexImage 10 Solar System Colour Imager
1 Comment17 January 2023 | Admin
My experience with the Celestron NexImage 10 Solar System Colour Imager
As a 76-year-old, I decided during Covid-19 to strengthen my skills in photography, to start again on my interest in astronomy and maintain my interest in computers. I have now reached a stage where I am combining all three and entering into the field of astrophotography. I have used my DSLR Olympus camera with my Celestron Nexstar 4SE with some degree of success, both by connection to the dedicated connector or via the eyepiece. It should be said in relation to those of an expert they are sadly lacking but for me as a relative novice they are pretty good especially the Moon and Jupiter.
Taking a video, especially of Jupiter, is recommended as the best way to achieve good images as one can then process via several free software packages to provide an enhanced image. The time came when I decided I would like to have a dedicated astro-camera to provide me with an opportunity to get photos of more of the solar system. I decided on the Celestron NexImage 10 Solar System Colour Imager to take me forward.
I would like to share my early experiences for those beginners like me. I have no doubt that experienced astrophotographers would smile, but probably empathise with my difficulties. The Celestron Neximage 10 is basically a webcam camera for the night skies. It uses a light-sensitive imaging sensor to capture streaming video of any solar system object. This is then processed in the supplied computer packages. (For full specification, go to https://www.celestron.com/products/neximage-10-solar-system-color-imager#specifications)
The Package consists of the camera, 1.25 nose piece, USB cable and an installation CD (Yes a CD but don’t worry all the programmes are available for download from Celestron support at https://www.celestron.com/pages/drivers-and-software)
The first task is to install or download the software and drivers to your computer. Do ensure that you load the relevant drivers down and follow any instructions regarding drivers that might appear when you open your software. (iCap is supplied, but others like Firecapture are available).
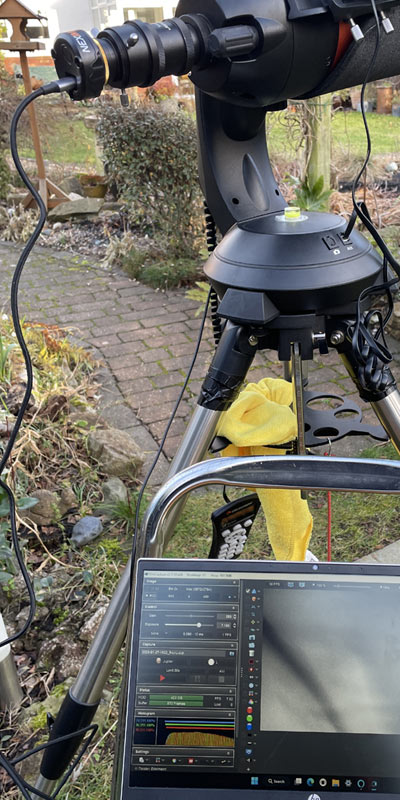
Once you are satisfied the software etc is correctly installed, then connect the USB cable to the camera. (This cable is relatively thick, weighty and not very user-friendly, so I would suggest that you replace it with a modern braided cable)
On first opening the iCap software (latest version 2.5) you should see a box open with a graphic of the camera thereon. If it doesn’t then your laptop has not recognised the camera. In my case it related to the driver which needed updating and from then no problem.
The above is pretty straight forward, but now follows the challenging phase, or at least for me, and that is trying to get an image on your computer using the camera. Insert the camera into your eyepiece support or connect directly to the specific camera port if your telescope has one. My Celestron Nexstar 4SE does have one, but the Celestron Neximage 10 does not screw onto it and requires an adapter which attaches to the Celestron T adapter and then goes into that adapter like a lens. It will screw into SE5 and above. I use both the adapter and eyepiece connections.
On first use and many other uses thereafter I got increasingly frustrated as I could not get an image on my laptop and that included the moon. I was worried the camera was not working. Unlike my DSLR which shows the image straight away, you have to remember that the Astro cameras like the NI10 do not (unless you are lucky and the settings of your software is correct). Following many chats with a very experienced Astro Photographer at Celestron I now understand what he meant when he said it would all fall into place. It is a bit like riding a bike in that one can have so much difficulty and then suddenly you are there and riding.
This is what I did, following Celestron's and PicStop’s advice:
A Watch YouTube videos on Image10 and iCap. Just put either in the search.
B Move the camera about, and you should see some white flashes or similar appear in the video window. At least this indicates the camera is doing something.
C Do some playing with the camera in the daylight by using a long distant terrestrial object, my longest was a chimney top. It is easier to get yourself familiarised by doing things in the daylight and using an object that will not move.
D Focus your telescope on your object with your telescope lens, and then attach the camera to the computer and telescope using whatever connection you prefer.
E If, like me, you will probably find the video screen still lacking in any activity. This is the point you will realise the next stage is about focussing and the settings of the exposure and gain settings. On my first two attempts I had no success, but on my third I had the gain and exposure settings at mid-point and started turning the focus wheel when suddenly some light appeared until eventually got the chimney in focus. Eureka, I was so delighted the camera definitely worked, and I was starting to understand what was necessary and that it was not as straight forward as the manual might suggest.
F When in focus, alter the exposure and gain to see if you can get a better picture and then take an image or a video. These will be saved on your computer for use with your software later.
G For Solar use, it is the software that takes your video and improves it. The use of this software is another steep learning exercise, and I would have been lost without the assistance of the many videos on YouTube about using the 10 and the software. I am beginning to get the message now, but I am far from being proficient.
H Once you have achieved getting your terrestrial image, then have a go at using it, say to capture the moon. The moon obviously because of its size and brightness, although when anywhere nearly fully illuminated this can have its issues.
Whilst it can all be frustrating, depending obviously on your knowledge and perhaps good luck, I do enjoy the challenge and learning experience. It is that challenge and enjoyment of success that makes it a wonderful hobby. I am proud of my photos to date, even though they are really rubbish, but I am sure I will improve as the months pass. I still continue to practice on a terrestrial object. I am happy, despite the above, with the camera and would recommend it as one worth serious consideration. Whilst others are available, at varying costs, I have no doubt that one would have the same difficulties to begin with as those difficulties were not the camera they were with me learning that astrophotography is different and far more complex as it is not the camera that sorts out the image but the software and your knowledge of how to use it.
Have fun, don’t get too frustrated, persevere and things will start to come together.
Review by Malcolm P


A very useful review Malcolm thanks
Any chance of seeing some images and the relevant settings taken with both the DSLR and the NEXIMAGE 10 SOLAR SYSTEM COLOR IMAGER?